3. Setting Up a New Wireless Network
If
you’re setting up a new wireless network using a wireless router or
access point, the hardest part of the job is setting up security and
Internet access settings in the router itself. There are three ways to
configure a new router:
Using a setup program provided by the
router’s manufacturer on a CD or DVD. This is usually the quickest and
easiest method, since the setup program knows exactly how to configure
your router. If you have high-speed Internet service, the setup program
may also be able to set up the router to connect to your Internet
service at the same time. (The next two options don’t do that).
If
your router supports WiFi Protected Setup (WPS), using the Set Up a
Network wizard provided with Windows 7. If your router has eight-digit
numeric PIN code printed on the bottom, or if it has a pushbutton
labeled WPS, you can use this wizard.
Manually, by connecting to the router using a web browser.
Tip
Before you get started,
you might want to check the router manufacturer’s website to see if a
firmware update is available. (Firmware is the software built into the
device.) Update the firmware following the manufacturer’s instructions
before you start using the network since the update process sometimes
blows out any settings you’ve made in the router, and you’ll have to
start over as if the router was new. It’s still worth doing this, as
firmware updates are usually issued only when serious bugs have been
found and fixed. |
I give general instructions for these three
setup methods in the following sections. The manufacturer’s instructions
might be more detailed.
Whichever method you use, as I mentioned in the
previous section, you need to select up to five things to set up a
wireless network: an SSID (name), security type, encryption type,
encryption key, and possibly a channel number. A setup program or the
Set Up a Network Wizard might help you make these selections
automatically.
Using the Manufacturer’s Setup Program
The easiest way to set up a wireless router is
using a program provided by the manufacturer. Connect one of your
computers to the wireless router using an Ethernet cable, then run the
program from the manufacturer’s CD or DVD.
The setup program will typically suggest
default settings for the router, which you may change. As I mentioned
previously, select WPA2 security unless your router or one or more of
your computer’s don’t support it.
You should write the final settings down,
especially the security key. The setup program will then install the
settings in the router. When your computers detect the new wireless
network, you can connect to it and type in the security key.
If the router doesn’t set up Internet service, see “Setting up Internet Service” after I describe the other setup methods.
Using the Set Up a Network Wizard
If
your router supports the WiFi Protected Setup (WPS) automatic
configuration scheme, Windows 7 can set up the router for you
automatically. You’ll need the router’s 8 digit PIN number to use this
method. The PIN might be printed on a label on the bottom of the router,
or, you might be able to find out what the PIN is by connecting to the
router using a web browser. I’ll tell how to do this shortly. Also, this
method works only on a router that has all of its factory-default
settings and hasn’t yet been configured. (If you have a used WPS-capable
router, you may be able to use its setup web page to restore its
factory default settings.)
To Set Up a Network wizard, follow these steps:
1. | Connect
your computer to the wireless router using an Ethernet cable, and power
up the router. Wait 60 seconds or so before proceeding. If you are
prompted to select a network location, choose Home.
|
2. | Click on the Network icon in the taskbar and select Open Network and Sharing Center.
|
3. | Under Change Your Networking Settings, select Set Up a New Connection or Network. Highlight Set Up a New Network and click Next.
|
4. | Wait
for your wireless router to appear in the dialog box. When it does,
click Next. If it doesn’t appear within 90 seconds, it might not be WPS
capable, or it may already have been configured. If so, skip ahead to “Configuring Manually,” page 470.
|
5. | Enter
the PIN code printed on your router and click Next. If the PIN is not
printed, see if you can get it out of the router. Follow steps 2 through
5 in the section titled “Configuring Manually”
to get into the router. See if any of its setup screens display the WPS
PIN number. (On a TrendNet router I tested, I found this under
Wireless, Wi-Fi Protected Setup).
|
6. | Adjust the network name if you wish, as shown in Figure 1.
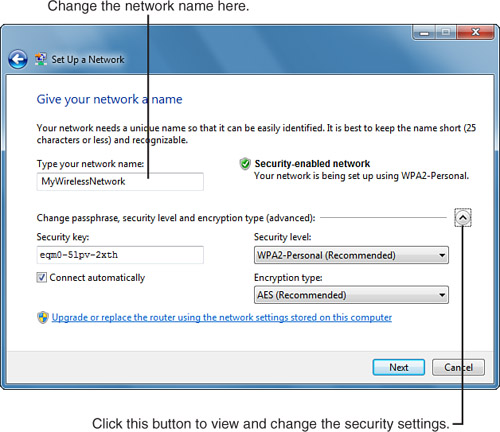
If not all of your computers support WPA2 security, click the
circular arrow button to expand the advanced settings section. Change
the Security Level to WPA-Personal if all computers support that, or WEP
if that’s the best method supported by all of your computers. You can
also select No Security, but I strongly recommend against this.
When the settings are made, click Next.
|
7. | The
wizard will configure the router, and will eventually display the
security key. Write this down and keep a copy of it in a safe place. (If
your location is secure, you can write in on a sticky note and attach
it to the router itself).
I suggest that you also click Print These Network Settings,
which displays a WordPad document that lists the security information
and also provides instructions on setting up other computers. You should
print this document.
|
8. | You
have the option of using a USB thumb drive to copy the network settings
to other computers. If you want to do this, plug in a removable USB
drive, click Copy the Network Profile to a USB Drive, and follow the
wizard’s instructions. Carry the drive to each of your other computers
with wireless adapters, insert it, and run the setupSNK.exe application.
Alternatively, just type in the network key manually at each computer.
|
When
you’ve followed these steps, your computers can all attach to the
wireless network, using the network key that the wizard selected. If you
need to set up Internet service as well, see “Setting up Internet Service” after the following section.
Configuring Manually
If you have to configure your router manually,
your best bet is to follow the manufacturer’s instructions. I can’t give
you specific instructions here, but I can give a general outline of the
process:
1. | Connect
your computer to the wireless router using an Ethernet cable, and power
up the router. Wait 60 seconds or so before proceeding. If you are
prompted to select a network location, choose Home.
|
2. | Click Start, All Programs, Accessories, Command Prompt. Type the command ipconfig and press Enter.
|
3. | Look
for the heading that reads something like “Ethernet Adapter Local Area
Connection,” and under that, look for the Default Gateway setting. It
should be 192.168.0.1, 192.168.1.1, or something like this.
|
4. | Open Internet Explorer, and in the address bar, type // followed by the Default Gateway numbers (for example, //192.168.0.1) and press Enter.
|
5. | Log on to the router using its administrative username and password. In many cases you can leave the username blank and enter admin
for the password, but this varies by manufacturer. You’ll have to read
the instruction manual or search the Web to find the default password
for your router.
You may wish to change the default password as your first step.
If you do change it, be sure to write the new password down and store it
in a secure place.
|
6. | Use
the router’s web page menus to locate the Wireless configuration page.
Enter a network name (SSID), select a security type, and enter a key.
|
7. | Use
the appropriate “save settings” button or menu choice, wait 30 seconds
and try to have one of your other computers connect to the router using a
wireless adapter, following the instructions under “Joining an Existing Wireless Network” on page 472.
When other computers can connect successfully, if the computer
you used for setup has a wireless adapter, you can disconnect the
Ethernet cable. (Ethernet connections are faster and more reliable than
wireless, though, so use wired connections whenever it’s convenient to
do so.)
|
When your computers can connect to the wireless router, you can have the router establish an Internet connection for you.
Setting Up Internet Service
Once your wireless network is working and your
computers can connect to the wireless router, you will probably want to
have the router share a high-speed Internet connection.
If you used the manufacturer’s setup program to
configure your router, it may have set this up for you already. If you
have to set up the Internet side of your router manually, try to follow
the manufacturer’s instructions. I can give you only general
instructions here.
To set up shared Internet service, view to the
router’s setup web pages by following steps 2 through 5 in the preceding
section, “Configuring Manually.”
Locate the router’s Wide Area Network (WAN) or Internet setup web
pages. Many routers have button that you can click to run an Internet
setup wizard; otherwise, you’ll have to set up the connection manually.
In general terms, there are three ways to connect:
If your wireless router’s WAN
(Internet) port is connected to a network that has an Internet
connection, chose the router’s “direct connection” option.
If
you use Cable Internet service, most likely you’ll select the DHCP
option. You may have to enter a specific host name supplied by your
cable company. Other cable ISPs key off your network adapter’s MAC
address, so you may have to call the ISP to inform them of the router’s
MAC address (which is usually printed on the bottom of the router).
If you use DSL service, most likely you’ll select the PPPoE option. You’ll have to enter a username and password.
Your ISP should help you get the Internet
connection working, or at least, they should provide you with the
information you need to get it working.
Joining an Existing Wireless Network
If
you are using a wireless connection on a corporate network, your
wireless configuration can and should be managed by your network
administrators. Your administrator will most likely install a security
“certificate” file that will identify your computer as one authorized to
use the wireless network. It’s also likely that you won’t need to—or be
able to—change any settings to use the network.
Note
If the network you want
to use doesn’t appear, it could be because the signal is too weak. Also,
some people prevent their router from broadcasting the SSID name over
the airwaves. |
However, if your home or small office wireless
network has already been configured and you’re just adding a new
computer, or if you are taking your computer into someone else’s office
or home and want to use their wireless network, connect to and use the
network by following this manual procedure:
1. | In the notification area, locate the network icon and click it.
|
2. | Windows
displays a list of the names (SSIDs) of the wireless networks that it
“hears.” Click the network you want to use and then click Connect.
|
3. | Windows
determines what type of security the network is using. If the network
is encrypted, it prompts you to enter the network key. Enter the
passphrase or the 10- or 26-digit hexadecimal key that was used to set
up the network to begin with.
|
4. | When
the connection has been established, Windows will ask you to select a
network location: Home, Work, or Public.
|
After the wireless connections are made, you can
continue setting up the rest of your network, as described in the
following sections.